Before selling any computer, smartphone or tablet, it is essential to protect your privacy by formatting the device. Formatting – as you surely know already – is a process by which you delete all files on a drive keeping it serviceable.
Be careful though: simple formatting is not enough. To make sure that your old data has been truly deleted and cannot be subsequently recovered with some specialist software (like the ones I mentioned in the tutorial on how to recover photos on Android), you need to overwrite all the empty space on the drive using a process called “wiping”.
I know that it may seem like a tricky thing to do – a prerogative of experienced users – but it really is not so. In order to prove it, I will now explain how to format Android and how to “wipe” a smartphone or a tablet using some free apps. I bet you will be surprised by how simple it is!
Preliminary operations
Backup
Before formatting your device, save a backup copy of all its files and apps. There are a lot of apps suitable for the purpose, and I will point some out to you right away:
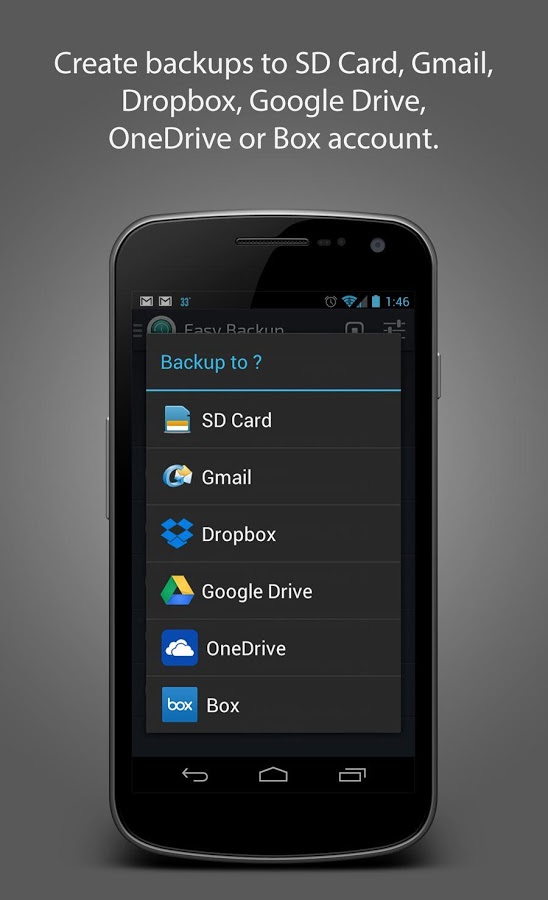
- Titanium Backup (Need Root)- the best app for backups on Android devices. It saves apps and data on external or internal storage. I have explained how to use it in quite some detail in my guide about how to backup Android.
- EasyBackup – another backup app, less powerful than Titanium but works without root access. You can find info and instructions on how to use it in the post about Android backup I have just linked.
- SMS Backup & Restore – Excellent free app that lets you back up all text messages saved on your phone.
Speaking about text messages, I must point out my post on how to re-install WhatsApp where I have shown you the proper steps to save WhatsApp chats and restore them if necessary
After completing the backup of apps and data, remember to transfer everything to your PC, otherwise after formatting your Android device you will also lose all the file backups that you just created!
Deleting Photos
The standard Android formatting procedure could leave photos and screenshots untouched. In order to prevent this from happening, manually remove all images by following these simple steps.
- Launch the Gallery app;
- Tap on menu in the top left corner (the icon with three horizontal lines) and select Album from the sidebar.
- Tap on the icon with the three vertical dots in the top right corner and select Select album from the drop-down list.
- Tap on all the albums in the gallery and then tap on the bin icon (in the top right corner) and then on OK.
Formatting the device
You can now get to the heart of the procedure by performing a standard formatting of your smartphone/tablet. A standard formatting will erase all apps, the majority of data (at least superficially) and reset Android to factory state.
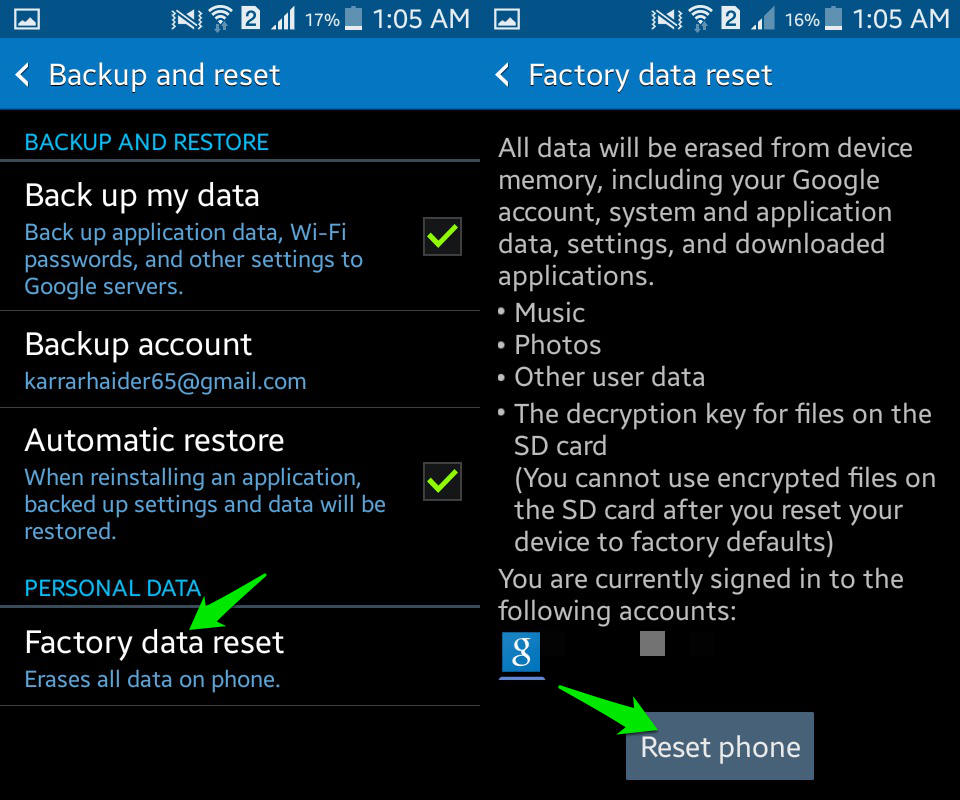
Go on system settings (tapping on the gear-shaped icon in the list of installed apps) and select Backup and reset > Factory data reset from the menu. After you have done that, if the option is available, put a check mark next to erase SD card and press reset phone/device.
At this point, the phone will reboot into Recovery mode and you will have to wait a few seconds for it to be done. While the phone is formatting and rebooting, you might see the opening screen with Android’s little green robot and some writings in English.
Device configuration
Wait for the Android formatting procedure to be finished (it should only take a few minutes) and get ready for the initial system setup.
Now, considering that you want to leave as few traces as possible on the device but that you need to install the wiping app at the same time, you have three ways of going forward.
- Turn the Wi-Fi on, create a fake Google account without synchronizing data and download the app normally from the Play Store (deleting everything after you are done with the wiping).
- Turn the Wi-Fi on, without setting up any Google account, and download the app’s apk package from a third party website.
- Leave the Wi-Fi off, without setting up any Google account, and transfer the app’s apk package from a PC.
The first procedure is the easiest – and safest, I would add – since downloading the wiping app’s apk package and manually installing it puts you at risk of incurring into Android malware, or at least into unsafe websites.
Connect to a Wi-Fi network then, follow the initial Android setup procedure, and create a new Google account to be used only for this purpose – rejecting the automatic data synchronization option.
Android wiping
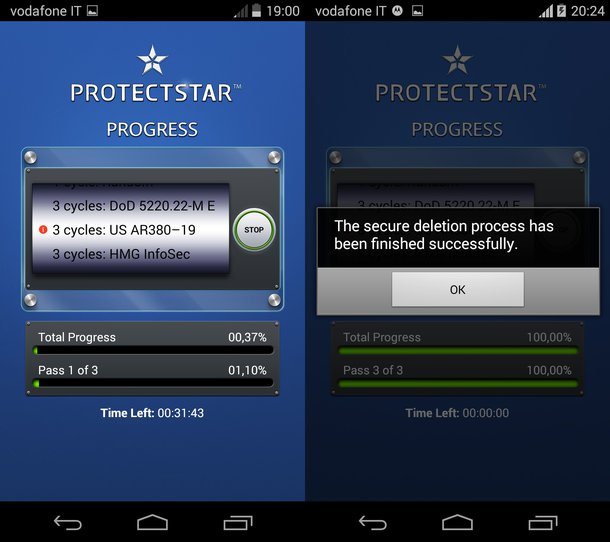
Finally, you need to go forward with wiping any unused space remaining on your device. In this regard, I suggest you install iShredder, which is equipped with the most advanced technological standards as well as being fairly quick.
iShredder is available in three versions: a free version that works only with internal storage and offers fewer wiping options (it should be enough in most cases, though); a Pro version (available for $3.49) with more wiping options (including SD cards wiping), and the Enterprise version (5.99 dollars)- which also supports SMS and temporary files wiping.
After you have installed iShredder, plug your phone charger in and launch the app. Press Start, select one of the wiping options (e.g. 3 cycles US AR380-19 )and tap on SHRED to start cleaning your device.
After iShredder has finished, go to Android settings, delete your Google account and the connection info about the Wi-Fi network you used to connect to the Play Store. Good, you can now sell your device without running the risk of someone recovering your data!