Are you afraid that your dear – and pretty expensive – Android smartphone could suddenly get broken? That you could lose all apps and data you saved on the device? Well, it’s good of you to be worried of it. But don’t be paranoid!
By now, there are really lots of apps with which you can save data from Android devices and, when needed, restore it pretty easily. Install one of those on your smartphone, and you’ll finally free yourself from worries of losing texts, contacts, photos, videos, calendar appointments or any other data saved on the device’s memory.
Be careful though: the most effective and complete apps for Android’s backup need the root. This means that – if you haven’t done it yet – you must read my guide about how to root Android and unlock you phone, by following its instructions. Then, roll up your sleeves and find out precisely how to make an Android backup, with the instructions I’m giving to you. I assure you everything will be easier than you think.
Titanium Backup
Titanium Backup is the top about Android backup. It lets you copy all the apps installed on your phone, their settings and data, offering, at the same time, a quick restore option, which allows you to reintegrate them on the device just with a few “taps”.
It’s available in two versions: a free basic one, and a 5,99€ one, which offers the opportunity to restore all the apps at the same time without any operation by the user, to encrypt backups, to keep more versions of the same app, and offers the support for cloud storage services (such as Dropbox, Google Drive and Box). It needs root to work properly.
How to use it? Nothing could be easier. Once you’ve downloaded the app from the Play Store, you have to run it, give it root permissions (by tapping the Grant button when the SuperUser or SuperSU warning appears) and select OK to enter its main menu.
If more warnings appear, such as the one about the necessity to activate the USB debug, follow the app’s instructions and enable all required functions through the Android’s settings panel.
Now, select the icon at the top-right of the screen (the paper with the checkmark). Tap the Start button, next to the Backup all user apps + system data option, and the tap the green checkmark at the top-right, to make a complete backup of apps and data.
As al alternative, if you want, you can choose the Backup all user apps option to save the app only (without data), or, vice versa, the Backup all system data option, to save data but not the apps.
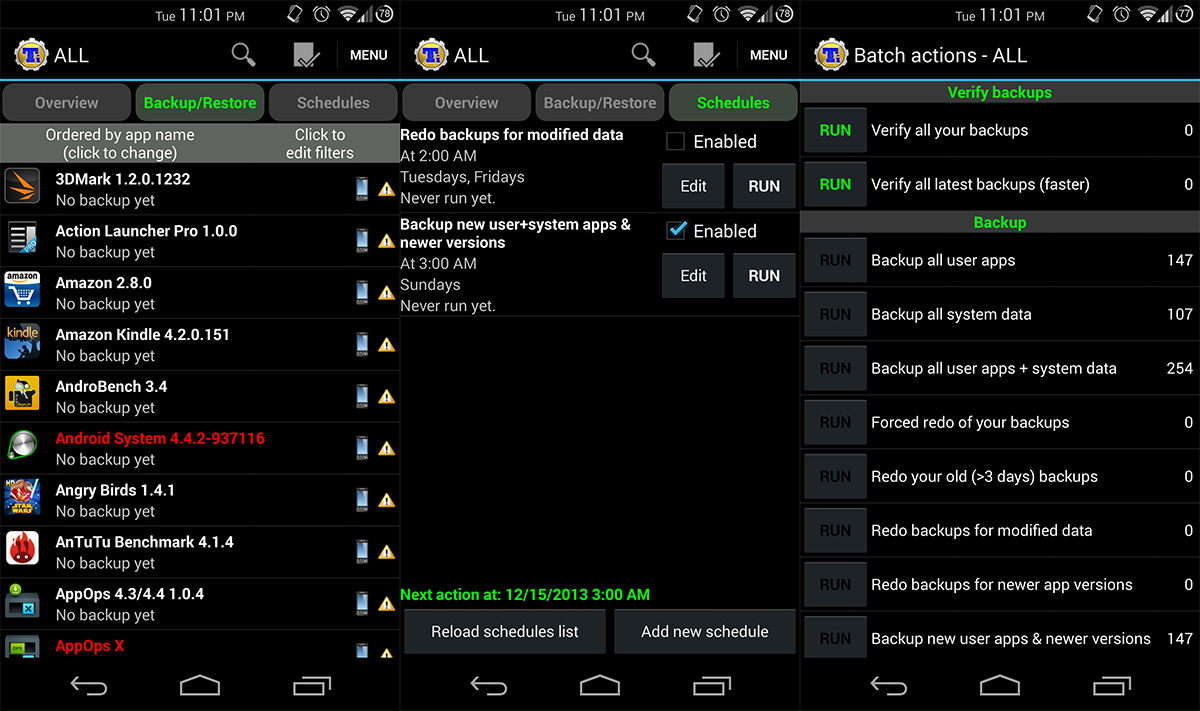
To restore previously made backups, go to the Titanium Backup’s Batch Backup/Restore menu, press the Run button besides the Restore all apps with data entry, or the Restore missing apps + all system data (to restore missing apps and data only) and select the green check at the top-right.
Helium
Helium is an Android backup app, very similar to Titanium, but different from it, since it gets to work even without root. Users who haven’t unlocked their device yet, in fact, can enjoy all its features just by connecting the smartphone to the PC and installing a simple Chrome extension on the computer. While, users who rooted Android, can use the app directly without connecting the device to the PC.
Helium is available in due versions: a free one, which allows you to save and restore the apps on your own device, and a 3,71€ one, which lets you copy the apps from a device to another and to restore the backups made by cloud services.
You can extremely quickly understand how it works, but, as I told already, if you haven’t root your device yet, you’ll need to follow a few more steps. Here you can find everything explained in detail:
- As a first step, you have to download Helium from the Play Store and install it on your smartphone;
- Then you need to download the drivers for your smartphone and install them on the PC;
- Once the drivers installation is completed, run Chrome on the PC and install the Helium app for Google’s browser;
- After the app’s installation in Chrome is done too, you need to run Helium on the phone and follow the instructions on the screen. First you need to press OK and log in with your own Google account, then press OK again, enable USB Debug on the phone and set the PTP connection mode on;
- Then as last step, open the Helium app in Chrome, connect the smartphone to the PC and accept the USB Debug activation on the phone.
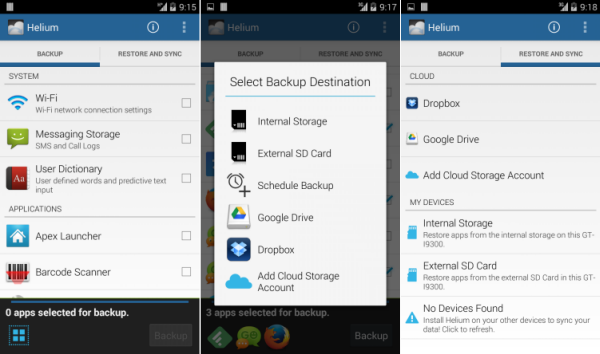
Once the first setup is completed, you can disconnect the smartphone from the computer and run the backup of your apps with Helium
Now, put the check besides the icons of the apps you’re interested in, tap the Backup button at the bottom-right of the screen and choose if you prefer to save the apps on the internal memory or on the phone’s SD card, or through a cloud storage service.
Then, you’ll have the possibility to restore your backups from the Helium’s Restore and sync panel, by selecting the backup to use. See, easier done than said!
Easy Backup & Restore
Easy Backup & Restore is another free app that I highly suggest you to consider. It lets you save texts, calendar events, browser’s bookmarks, call history and contacts in a few simple taps. Data can only be saved locally, on SD card or on the device’s memory, but also by cloud services like Dropbox and Google Drive. It’s great, isn’t it? And it doesn’t even need the root to work.
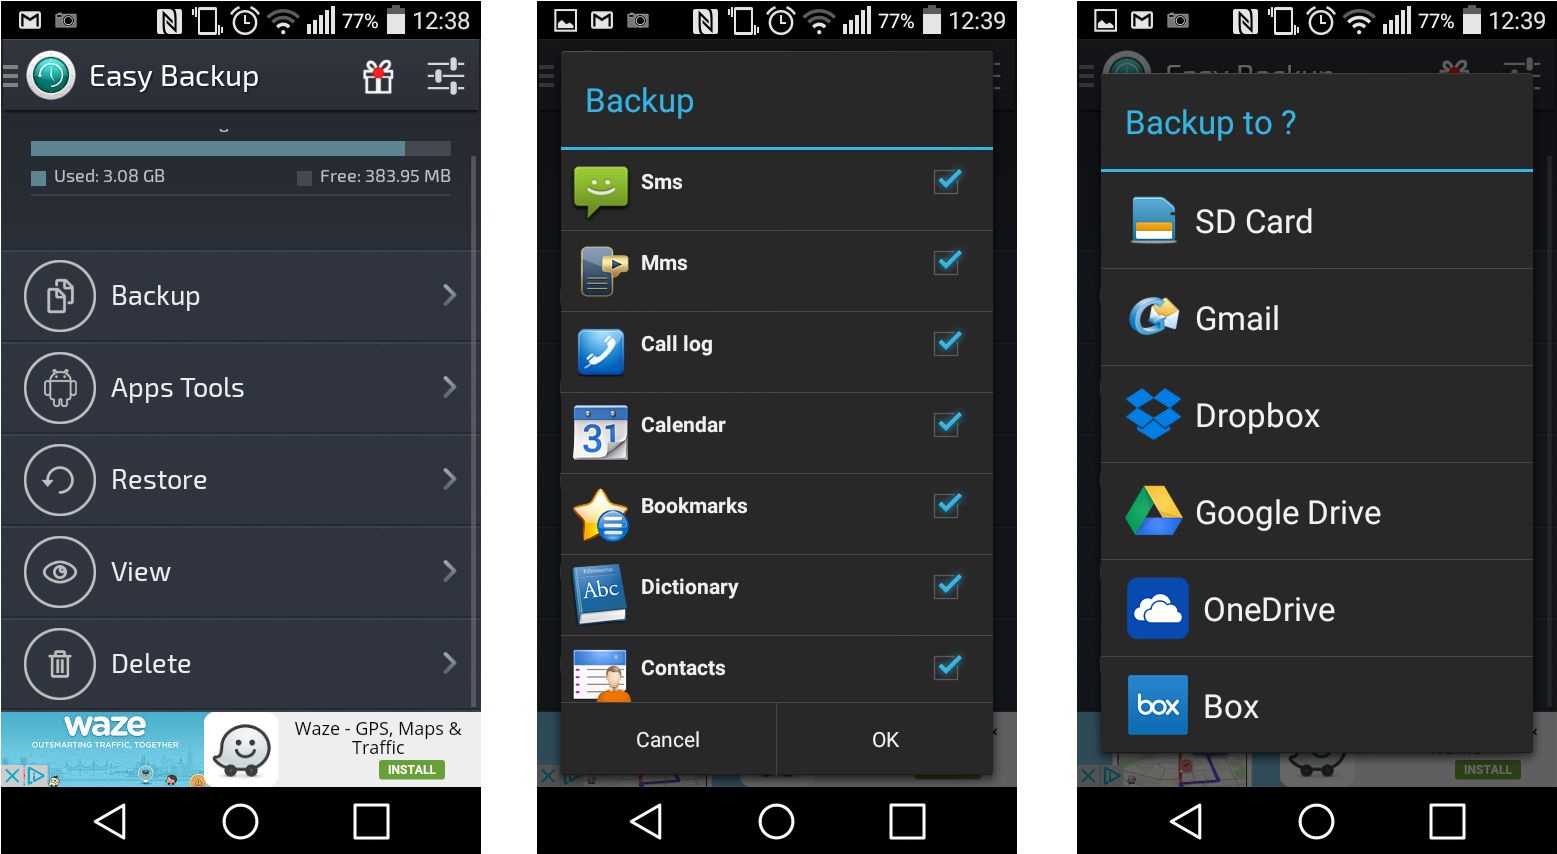
It’s extremely easily understood. To run a backup you only need to press the Backup button, put the check besides the entries related to what you want to save (texts, MMS, call history, Calendar, Bookmarks, Dictionary and Contacts) and tap the OK button.
Then you need to choose whether to copy the data on the SD card inserted in the phone (this option lets you choose the phone’s memory itself as destination too), or with a supported cloud storage service (Dropbox, Google Drive, OneDrive, Box or through Gmail, just as an attachment). In the end, you have to assign a name for the Backup and start the procedure.
The restore process of the previously saved data by Easy Backup is pretty simple: you just need to tap the Restore Backup button, select the data source (such as the SD card or Dropbox), choose the backup to use for the restore, and that’s it.
I’d also like to highlight the Apps Tools function, which allows to make backups of apps and their associated data (after installing the free BusyBox app, which needs root to work). It’s a surely useful feature but, if you can and if you’ve got an unbroken device, just prefer Titanium for the apps backup.
Photos, Videos and Music Backup on the PC
Until now, we’ve seen how to make an Android backup by handling apps, texts and contacts. But how can you safeguard photos, videos and music?
The quickest thing you can do is to connect your phone to the computer and copy the data on the PC “manually”, that is, using Windows’ Explorer or the Android File Transfer utility from Mac. Anyway, if you want to make it easier and copy contacts, messages and other data too, you can use some of the official apps released by the Android devices producers, which lets you to make the data backup process automatic. Here you can find a list of the most considerable ones:
- Samsung SmartSwitch – the software allows you to make the backup of Samsung devices on PC. It’s compatible with Windows and Mac OS X and it’s very simple to use: you just need a click to save or restore all the files located on the smartphone or tablet. Download from here
- HiSuite – the Huawei devices’ backup official software, for Windows only. Download from here
- Motorola device manager – the software by Motorola which lets you to run the smartphone backup on Windows and MAC OS X. Download from here
- Sony PC Companion – it’s an official software by Sony. Allows you to run the backup of Android smartphones and tablets on Windows. Download from here
- LG PC Suite – as you can easily see, it’s the software with which you can copy all the data from LG devices to the PC. For Windows only. Download from here
- HTC Sync Manager – the official sync software for HTC devices. Works on Windows and Mac OS X. Download from here
Cloud Backup
Besides the local data backup (on the PC or SD card) I suggest to always associate a cloud backup, that is an online one. To save contacts, photos, texts and other important data on the cloud, you can always count on the services offered by Google, which are completely free and integrated in Android already. Let’s find out how to use them.
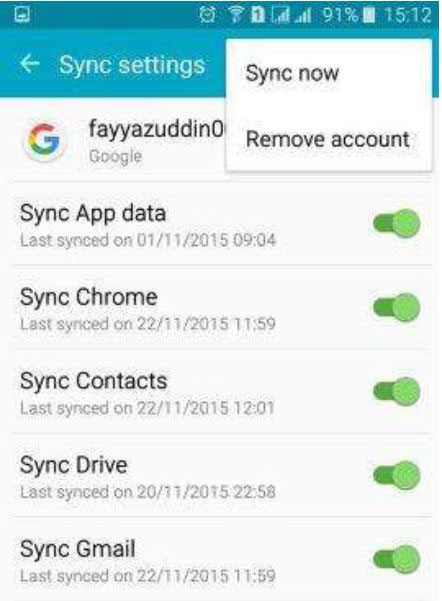
As regards contacts, emails, calendar appointments, and apps data, all the info should be synchronized online with your Google account automatically. To be sure that all the sync functions are enabled, go to the Settings > Account > Google menu in Android and select your Gmail address. If, among the options displayed, some of the ones that you’re interested in are disabled, enable them by moving the toggle besides their name to ON.
Now let’s see how it is about photos and videos. The Google Photo app, which should be part of the “standard” ones installed on your smartphone, but that you can freely download from the Play Store, allows you to archive all the photos from the Android gallery on Google Drive for free, without compromising the space available of the service. Really! All the photos with a max resolution of 16 MP, and videos with a max resolution of 1080p (Full HD), are saved on Google Drive automatically, without occupying any of the free space of yours.
To enable this pretty useful backup function, open Google Photo, tap the hamburger icon located at the top-left and select the Settings entry from the displayed menu. Here, select Backup and sync, move the toggle at the top to ON (next to the Backup and Sync entry), press the Storage size button and select High quality from the appearing panel.
An automatic photos backup function is available in the official Dropbox app, which gives you a 3 GB extra storage on your account but, personally, I suggest you to use Google Photo, which has got more interesting search and organization features too.
As regards music, if you haven’t totally joined Spotify or other music streaming services yet, you can use Google Play Music, which syncs you music library with the cloud and lets you listen to it in every moment, from any Android device (and not only).
Nandroid
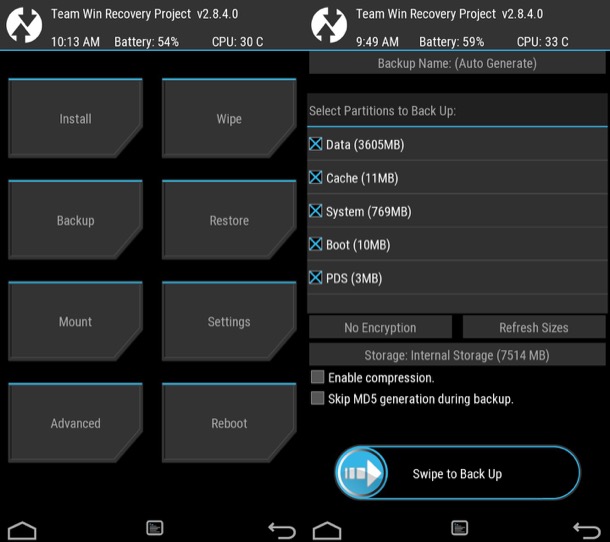
If you rooted your Android phone and installed a custom recovery (as shown in my guide) you can create a backup copy of everything you’ve got on the device: a real system image, called Nandroid, to copy on an SD card or just the phone’s memory.
It’s just about selecting the Backup entry from the recovery menu (you can access this menu by starting the smartphone with this buttons combination: Power + Vol (-) ), then select all the options available from the appearing panel (for example: data, cache, system, boot e PDS) and make a swipe on the button at the bottom.
To restore the backup, you must go to the recovery’s Restore menu ,select the archive to restore and swipe on the button at the bottom.
Read More:
How to reset android phone to factory settings
Root Android
Best Android Antivirus
I usually want to transfer my contacts and texts to pc, so I use a transfer tool, and I recommend the tool I am using now, MobiKin Assistant for Android, you can transfer contacts, texts, photos, videos, music files from phone to pc directly.