PlayStation VR just hit the market this week and has become many people’s introduction to the world of virtual reality. The following list of tips and tricks is supposed to improve your PlayStation VR experience. If any of the terminology sounds unfamiliar to you, we recommend you check out our virtual reality glossary. If you want to know how to set up PlayStation VR just have a look at this article.
Optimizing the Tracking
Playstation VR uses a camera in combination with LEDs on your headset and the PlayStation Move controller (Dual Shock 4 controllers can also be recognized). This method is of course less than subtle and these bright lights reflecting of off shiny surfaces can become a little irritating. That’s why we recommend darkening your room for PS VR. If you don’t need to have the Social Screen displayed on your TV you can just turn it off.
When saying shiny surfaces we not only mean mirrors. Even polished wooden floors or windows behind you can cause reflection that can irritate the camera and thus mess up the tracking. When the perspective onscreen is jumping back and forth you should check your surroundings for any shiny surfaces that might cause tracking issues.
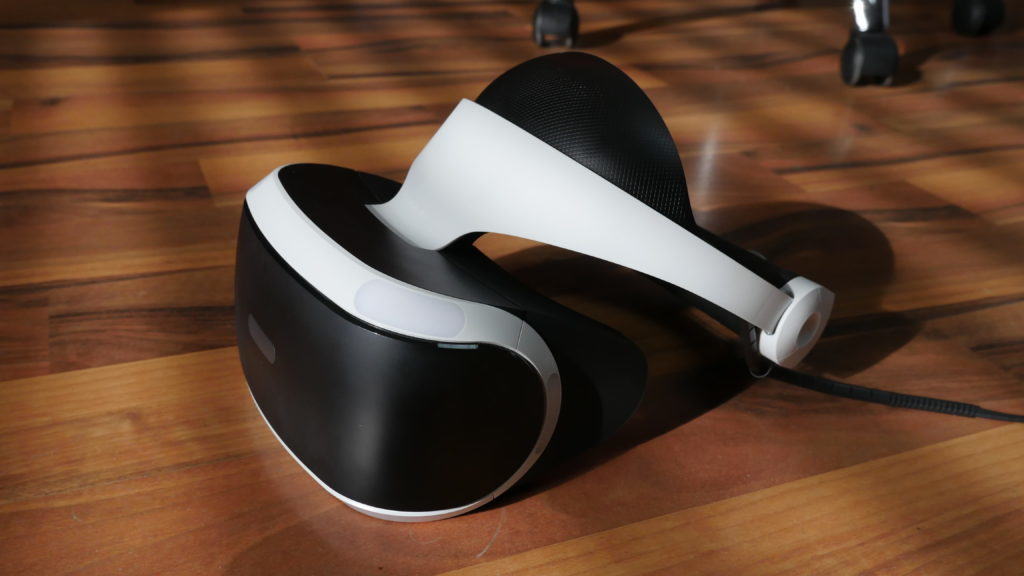
The PlayStation VR headset also has two LEDs mounted on the back which means the headband should always above your hair rather than obstructed by it. That way the tracking won’t get iffy when you turn your head 180°.
When you take of your PlayStation VR headset, you might get a message telling you to position yourself inside the red square on the screen. You don’t need to do that though. Just move your head into the red square for a bit and then sit back down while pressing and holding the “Option” button. That way the tracking will be reset and your head will be in the proper place for tracking again.
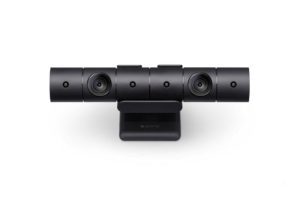
Even though Sony is offering an updated version of the Camera (PlayStation Camera 2016) you won’t need the latest model to use PSVR. The only advantage of the new model is that it comes with a TV mount out of the box. From a technical standpoint, there is no difference to the “classic” PlayStation camera for the PS4.
Note: If the image keeps moving to the side while playing, please consult this article.
Correctly Positioning the Camera
Even though you don’t necessarily need to stand dead-center of the camera’s view, you should always keep an eye on it. That means you shouldn’t move further of it than 3 meters. Any further than that and you will notice that PSVR is struggling with tracking. If the distance between your couch and your TV is greater than that you shouldn’t mount it on the TV itself. Sadly, the PlayStation camera doesn’t have a tripod mount which would make things much simpler. Instead, you’ll have to position it on a chair, coffee table or a similar piece of furniture.
| Tip 1 |
| The PlayStation camera should never move or slide around during gameplay. You need to make sure that it is properly stable and utilize some adhesive tape if there is no other way of mounting it steadily. |
| Tip 2 |
| Tracking works best when the camera is placed at eye-level. A Micophone stand can be used for quick height-adjustment. |
| Tip 3 |
| Position the camera so that the left lens has you in the center of its view. |
Getting a Clear Picture
If you’ve never worn a VR headset before the first thing you might critique is the screen resolution. You might also find that the picture is less clear than what you’re used to with your monitor. If however the image is blurry or causing eye fatigue you should try out the following methods for improving it:
Correctly Position the Headset:
Oftentimes, the PSVR headset doesn’t sit steadily on your head causing bad image quality. Sony’s headset often moves a bit on its own after you’ve adjusted it. You’ll need to adjust it until the picture looks great after you’ve let go of it. For us, that means manually adjusting it so sit a little higher so that it falls into the correct position on its own. In short: The picture needs to be clear after you’ve let go of it.
| Tip |
| Tip: Don’t be satisfied to quickly since even a few millimeters of adjustment could make all the difference. Try adjusting until you’ve found the position where the image is a clear as possible. |
Change the IPD Setting:
Those of you who haven’t played with an Oculus Rift or an HTC Vice yet maybe won’t know what this variable means. IPD describes the distance between the center of both your pupils. Adjusting this makes sure you won’t see a warped image in your VR headset. Before playing, adjust this setting until you get the best picture. You can find it under Settings –> Devices -> PlayStation VR.
| Tip |
| Tip: The IPD that PSVR measures with its camera isn’t really precise. You should rather consult an optitian or use one of these templates to measure it yourself |
Cleaning the Lenses:
The lenses inside a VR headset are prone to smudging. Quickly cleaning them with your shirt sleeve however can sooner or later create small scratches. If you want to enjoy your VR headset for a while be sure to take good care of it.
| Tip 1 |
| Use microfiber cloth to wipe the lenses in a circular motion. This doesn’t require a lot of pressure and will be very effective. |
| Tip 2 |
| Since even the gentlest method of cleaning that involves putting pressure on the surface can cause micro abrasions on a lens, a small professional dustblower can be used to get rid of dust. Professional filmmakers and photographers also use these to clean their highly vulnerable camera sensors. |
Using PlayStation VR with Glasses
If you are wearing glasses permanently you should try keeping them on while using PSVR. While that means that more light will leak into the headset, the image will be noticeable clearer. No VR headset currently on the market is more comfortable to wear with glasses as PlayStation VR.
| Tip |
| The thinner the frame on your glasses the less light will leak into your headset. Maybe you can find thinner frame glasses to use with PSVR. These don’t have to be particularly beautiful or expensive as no one will see what you look like underneath the headset. Contact lenses are also recommended and will of course get rid of light leaks altogether. |
Better Sound for Better Immersion
 The headphones that Sony are packaging with PSVR aren’t anything to write home aboute. They’re just simple and cheap in-ear headphones. While they provide good noise cancellation, the sound could be far better. In ear headphones are advisable to use alongside VR headsets since they’re much easier to wear in combination with them than say a pair of big over-the-ear headphones.
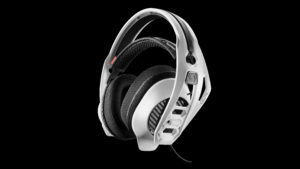
If you’re looking for a headset especially for PlayStation VR the Rig 4VR by Plantronics could be a worthwhile alternative. The construction of the headphones means that it won’t cancel out exterior noise as effectively but it harmonizes with the PSVR headset very well.
If you really want to take the immersion to another level and cancel out the entire outside world we recommend the Bose QC 25. The active noise cancellation they provide is simply a dream and will allow you to dive even deeper into the game. You need to be careful though as you won’t notice when someone else enters your room.
Reducing Motion Sickness
Currently the topic of motion sickness is commonly discussed in relation to Virtual Reality. You don’t need to worry about it too much though. From our experience, there are four types of people:
- People with no motion sickness whatsoever
- People who will start to feel motion sickness during fast past gaming
- People who will feel motion sick initially but will get used to the VR experience
- People who easily feel motion sickness and cannot get used to VR
Since we can’t tell you what category you would fall into, you’re best advised no to spend all your earnings on new VR equipment and software without having experienced it all that much before. A great way to test yourself is by checking out the Demo Disc that comes packaged with the PlayStation VR headset. Try out a couple of the games and you will see if you can cope with fast paced VR games.
If you are suffering from motion sickness after gaming you can consider the following tips:
| Tip |
|
More Immersion with PlayStation Move?
Indeed! When playing VR games with PlayStation move it gets much more immersive. Even with their not-quite-perfect tracking and only a small catalogue of software supporting the hardware, the controllers are a worthwhile expansion to your gaming rig. Sony now offers the Move controllers in packs of two which is great for VR. Remember that one single Move controller is pretty much useless for PSVR – you have two hands after all.
How Can I Watch Videos or Play Regular PS4 Games in VR?
In general, there is no way to “force” a VR mode in non-VR content on the PS4 but you can still experience this content through the PSVR headset. To do that, simply put on your VR goggles and start the content.
| Tip |
| When you press and hold the PlayStation button and enter the PSVR settings, you can adjust the image size displayed in the headset. There are three different levels. |
What is the Safest Way to Store and Transport my PSVR Headset?
The cardboard box that the headset is shipped in isn’t really a great way to carry it around in. Other manufacturers however have provided accessories for this purpose. One example is the carrying case by Hyperkin Polygon for 70$ (Details on Amazon) . While it doesn’t offer a hard shell, it should keep your headset safe as long as nobody sits on it. A similar accessory is offered by Navitech for only 35$. (Details on Amazon) This one might even be more comfortable since it is designed as a backpack with multiple compartments designed to store the headset and other bits of kit.
For those of you who want something more solid, there is an alternative made by 4Gamers. This one is a a pretty massive carrying case. Unless you want to take your PSVR headset to any bigger events, this seems like a bit overkill though. For those who want to take it to events or use it in exhibitions however, this might be a worthwhile investment.
You might have noticed that the only way to put the PSVR headset down is to simply place it on the table or the floor. BigBen have taken on this problem and have come up with a solution for it: They made a stand that you can hang the headset onto.
Recording and Livestreaming Virtual Reality Gameplay
If you want to record longer gaming sessions, using the internal recording function of the PS4 is inadvisable. For such tasks, external video capture devices like the Elgato Game Capture HD60 (Details on Amazon) are far better suited. These should sit between your PSVR box and your TV. What you do have to consider is that these devices will introduce some latency. For livestreaming PSVR games with a live voiceover, you would be better off going with an internal PCI-E capture card for your PC. Those can be found to the left.
To record your gameplay you can then use a free program called Open Broadcaster Software (OBS)
Step 1: Go to the OBS Project website and download the correct version for your operating system.
Step 2: Right-click on Scenes > Add Scenes > enter a name.
Step 3: Right-click on Sources > Add > Video device. Select the Elgato here.
Step 4: In the settings, set the quality of the stream and the service you want to stream on.
Now you can start streaming right away. If you want to record everything in great quality you should also go into Settings -> Broadcast Settings and change the format to MP4.
Read More:
PS4 vs. PS4 Pro
Is The PS4 Pro Worth Upgrade or Buying?
Google Daydream View vs. Samsung Gear VR, which is Better?