To protect our computer against viruses or a defective software this is best weapon. In just a few steps it allows us to restore the computer to a previous state and everything goes back to normal. This time we are going to show you how to enable system restore in Windows 10. It’s a quick process, without any further effort.
It’s a feature that few users value when having to deal with any threat. Obviously, we have to say that its use expose the computer to certain risk of losing information. This will depend on the frequency in which the restore points are created and the frequency in which we decide to use them. The more distant to the present day it’s more probable to happen. We also have to mention that enabling it will impact in the available storage capacity, although that’s something we can configure during the enabling process and once functioning.
How to enable system restore in Windows 10
In first place, we have to look for the configuration menu of this function. Since Windows 10 is organized differently than other versions of Redmond operative systems, let’s turn to Cortana. Writing “restore point” it should appear as first option “Create a restore point”. By selecting it, it will open a window in the tab that has what we are looking for. For those who want to look for it, it’s found in the System Properties window under the system protection tab, as you can see in the next image:
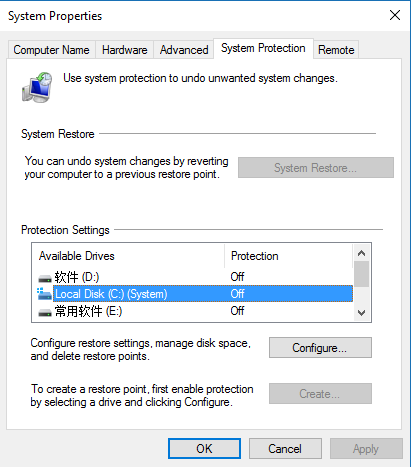
Now we have to choose over which unit we want the restoration to take place. Obviously, the local disk (C:) will be predetermined, though we can select as many as we want as long as they are available of course. Once selected we shall click the Configure button.

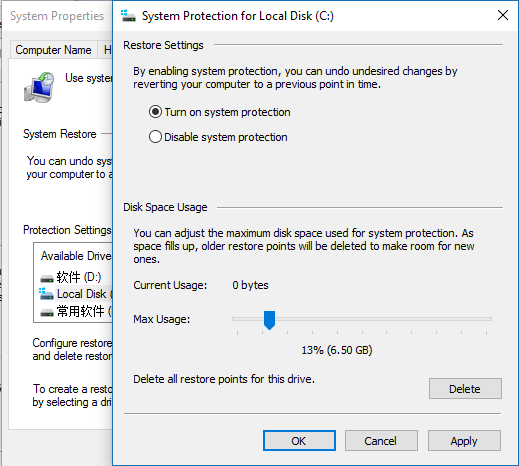
First we will enable the system protection and then we’ll decide on the disk space usage reserve for this purpose. The second part depends really on each user so we let that decision to your liking. Of course the more space you use more store backups through time we can use to restore without worrying about how old they are.
Once this is configure we click on apply and accept and we would already have enable restore points and the possibility to use them to go back to a previous state.
However, this doesn’t imply that one has created. Thus, after all of this we will create one as a starting point by clicking on the Create button.
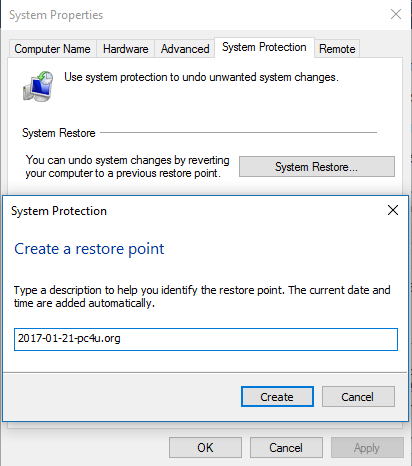
It won’t be necessary to configure or change any other settings. We will only have to choose a name for the restoration point. As an advice, it’s better to include the date with a small description. Although we may remember it right now, if later we need them we may not know what we are referring to.
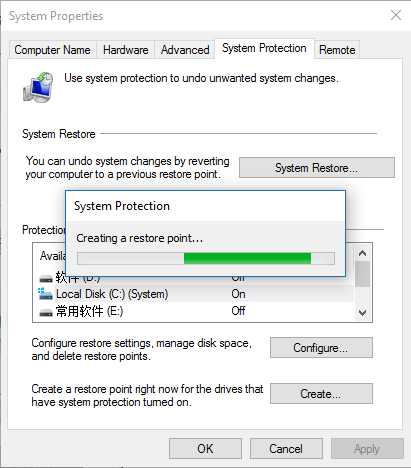
The process won’t take long, taking up to a minute. Once this is done our system is ready to use this defense mechanism to confront viruses and defective software.
Automatic system restore point rotation
During the installation process we had to choose the storage usage percentage we wanted to be used for these restore points. We have to have in mind that this is done automatically and that the user won’t have to intervene in any way. What we are trying to say, is that the system will be the one to manage the space. When there is not enough space left it will start to erase from the oldest one by one. For this reason, if we want to cover a bigger time period or not, we shall choose more or less storage usage respectively.
Read More:
Windows 10 Download
Best Antivirus for Windows
How to run Windows 10 from a USB flash drive