You have decided to sell your iPhone but do not know how to restore it and erase all data on the device? You have been noticing strange malfunctions that make your iPhone lose connection or “get stuck” from time to time? Do not despair: I am here today to explain how restore an iPhone and deal with this kind of situations.
What are you saying? You are not very good when it comes to technology and you are afraid that my suggestions are going to be too hard to follow or too complex for you? You have no reason to worry – I can assure you of that. You do not need to be a computer whiz or use any kind of specialist software to reset an iPhone, you have my word. The only thing you are actually going to need is a few spare minutes, together with a little patience and attention – nothing else.
We will start from the full phone restore procedure, which includes deleting all data and reinstalling iOS (the iPhone’s OS). We will then discuss how to reset specific settings only, without erasing all of the phone’s data. Ready to get started?
Restore your iPhone
Before restoring your iPhone and reinstalling iOS, see to the creation of a backup copy of all data, settings, and apps on your device. This can be easily done with iTunes, Apple’s multimedia software included by default in OS X and available for download on Windows (if you have an iPhone you have probably already installed and used iTunes).
If you use a Windows PC and you have not installed iTunes yet, click here to go on Apple’s website and then click on Download to download it on your PC. Then launch the installation package (called iTunesSetup.exe) and go through the setup clicking on Next > Install > Yes > Yes > Finish.

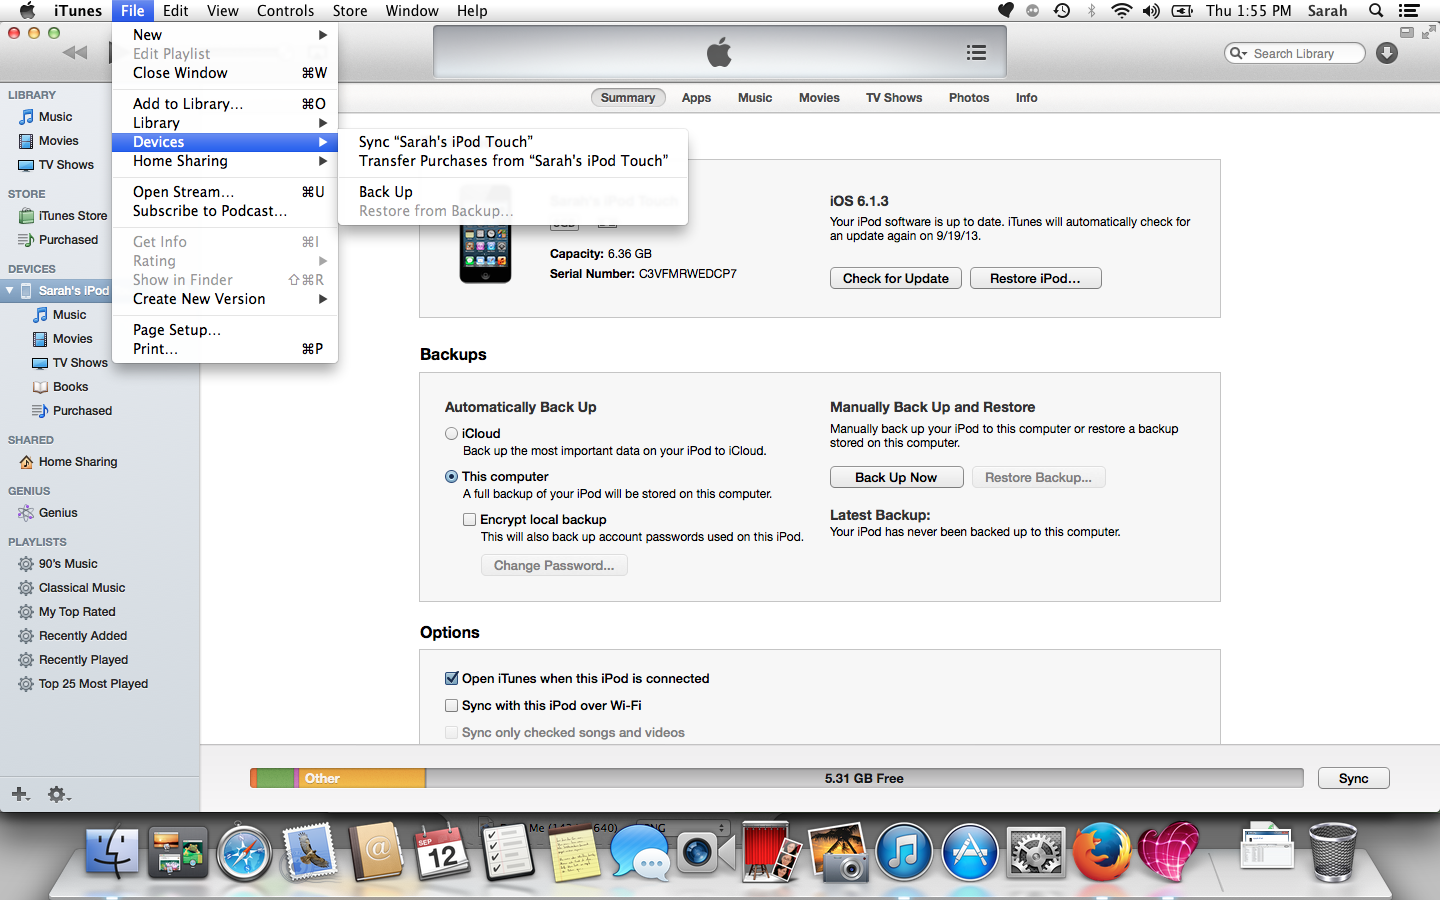
After installing iTunes, connect your phone to your computer with the Lightning/Dock cable, wait for iTunes to automatically start and click on the iPhone icon in the menu in the top left corner of the screen.
At this point, from the menu bar at the top of your computer screen or at the top of the iTunes window, choose File > Devices > Transfer Purchases from “[device name]” to copy on your PC all apps, songs and multimedia content stored on your device. Then select Summary from the sidebar on the left and click on Back Up Now in the Backup submenu (on the right side of the screen) to start backing up all apps, data and settings. Keep in mind that it may take quite a few minutes.
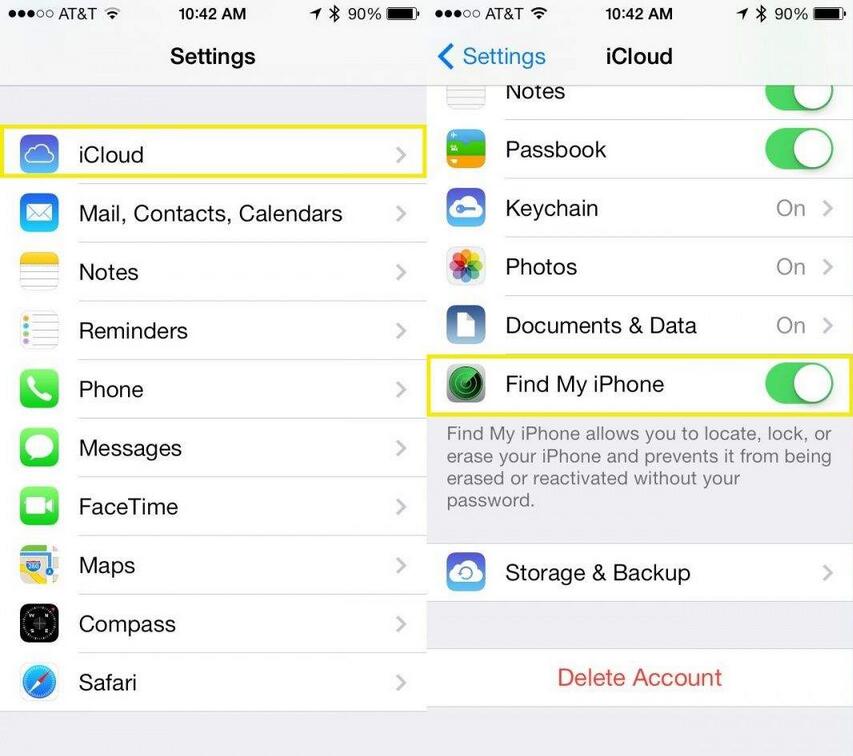
After iTunes is done with the backup, take your device and turn off Find My iPhone, a service which normally prevents phone formatting as a security measure. In order to do so, go to Settings > iCloud, then tap on the little switch to turn Find My iPhone off and then digit your Apple ID password.
At this point we are basically done! After backing your data up and turning Find My iPhone off, you can start the restore procedure. To do so, select the device icon in iTunes and, in the Summary panel, click Restore iPhone. Confirm that you want to go ahead with the process, accept all terms and conditions and patiently wait for the “resetting” to be finished.
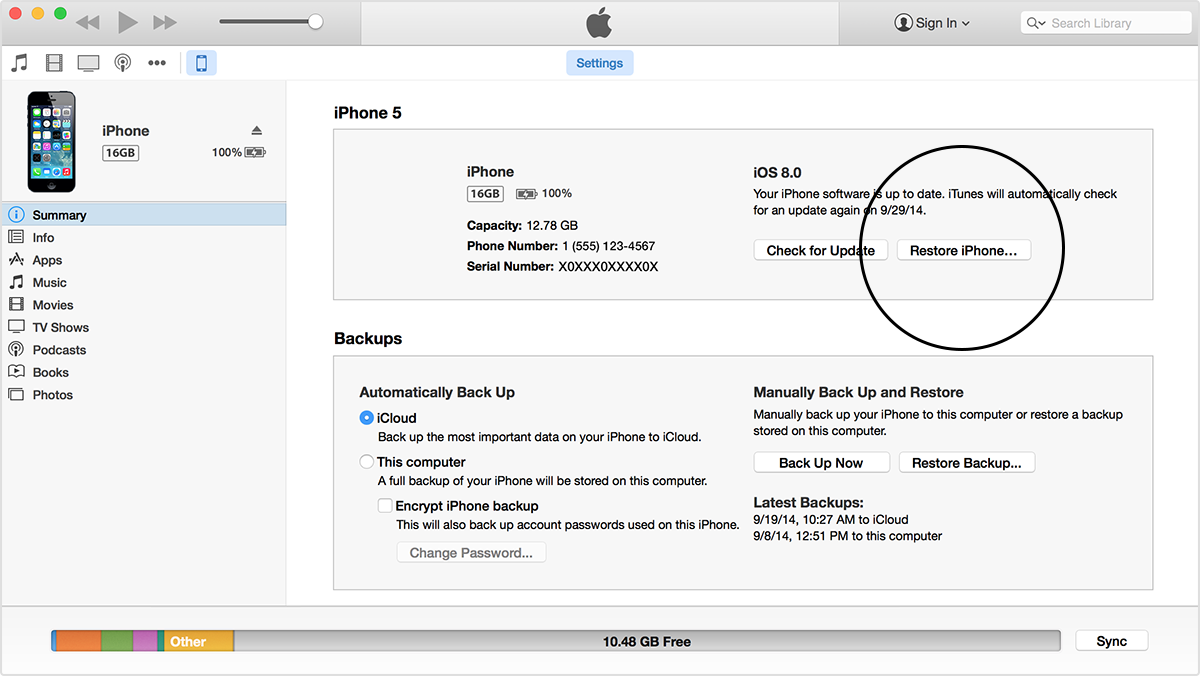
Keep in mind that you are going to need an active Internet connection as the program is going to download the latest iOS version (which will be installed on your device).
The OS is larger than 1GB, so the download might take a while, depending on the speed and stability of your Internet connection.
After the system restore, you can decide whether to set up the device as a new iPhone or restore it from a previous backup.
In the first case you do not have to do anything else. Or rather, if you plan to use the iPhone personally, disconnect it from the computer by pressing the eject button in the top left corner of the iTunes window, and then go forward with the initial setup of the device (setting language, country, Wi-Fi, Apple ID and so on). If you plan on selling the iPhone instead, turn it off normally after disconnecting it form the computer. The future iPhone user will then be able to configure the device themselves as I have already explained in detail in my guide on how to activate your iPhone.
If you are planning on restoring the iPhone using a previous backup instead, go back to iTunes, click on your device icon, select Summary from the sidebar on the left and click on Restore Backup… in the Backup submenu (on the right side of the screen). All you have to do now is select which backup you want to use to restore your device from the dropdown menu. Restoring from a previous backup could take several minutes.
Resetting iPhone settings
If your Apple-branded smartphone is giving you problems when connecting to wireless networks, cannot connect to 3G / LTE networks, or has other software problems of any kind, you can try to reset its settings to factory settings without erasing any data stored on the device. How do you do that? I will explain it right away, and it is really simple.
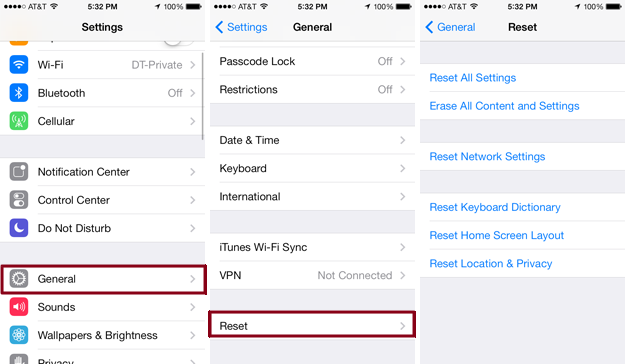
First, go to the home screen of your “apple phone” and press Settings, select General, slide down to the bottom and press Reset.
Now, you can choose between a few options: Reset all settings, to reset iOS settings without deleting any data; Erase all contents and settings, to reset iOS settings and delete all data on the phone; Reset network settings, to restore wireless and 3G/LGE connection settings; Reset keyboard dictionary, to take the keyboard back to the factory settings; Reset home screen layout, to set the order of the home screen apps icons back to default (apps will be set in alphabetical order); Reset location and Privacy; to restore the geographic location and privacy settings.
Select the option you need, insert your iPhone unlock code, and confirm the operation by pressing the red button shown at the bottom of the screen.
What to do in case of trouble
Are you willing to reset a previously jailbroken iPhone? Are you trying to restore your apple phone but you can’t get to carry out the operation due to some error? In that case, I suggest you to boot the phone in DFU mode. I’ve told you about it in detail already, in my how to boot an iPhone in DFU mode guide, but I’ll remind you of it anyway.
It’s about a recovery mode that allows you to install iOS, but bypassing a few restrictions of the standard mode. It’s highly suggested for jailbroken devices, since it manages to delete both Cydia and jailbreak’s data, which normally would keep using space on the phone.
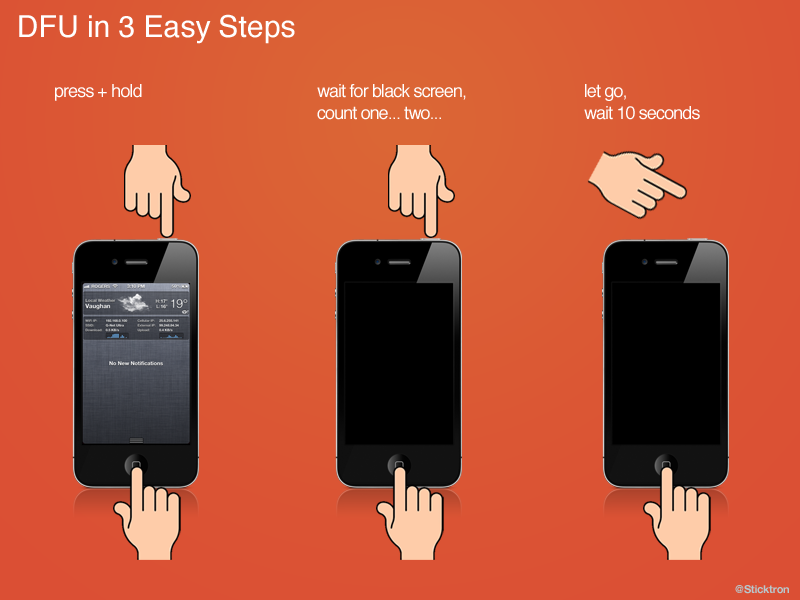
To boot you iPhone in DFU mode, connect it to the computer and turn it off completely, by pressing the Power button for a few seconds and then scrolling from left to right when the voice Scroll to turn off appears at the top of the screen.
Then, turn the smartphone on again by holding the Power and the Home buttons at the same time for about 10 seconds, then release the Power button and keep holding the Home one until iTunes tells you to have found an iPhone in recovery mode.
Once you’re done with these steps, follow the procedure we’ve seen together at the beginning to reset your iPhone, sure everything will go the right way now.
Read More:
How to Format Android Phones Manually