You try to turn on the computer and nothing happens. You scratch your head, check that all of the cables are connected and that the power button on the power strip is lit, but nothing. It’s highly likely that the power supply is dead. We will show you how to replace it.
Time:
- 30 minutes
Materials:
- Screwdrivers and pliers.
- New power supply
- A clip
- Multimeter
- Flanges and/or plasticized wire
1: The computer doesn’t turn on. What’s wrong?
In my experience, the components that fail the most in a computer – with normal use – are the hard drive, the power supply, the motherboard and the graphics card, in that order. The ones that fail the least are the optical drives, RAM and the processor. So, if your computer seems to turn on and even produces some sort of beeping sound, you will need to check the error code in the motherboard’s manual. At first, it doesn’t seem to be a power issue. However, if nothing happens when you press the power button it’s likely that there is something wrong with the power supply.
2: Avoid risks and remove static electricity
Before changing the power supply, the first thing you have to do is disconnect the power cord. It’s unlikely that you will receive an electric shock since the voltage it manages is not high, but the computer can receive some damage if there is an accidental short circuit. It’s also convenient to eliminate any harmful static electricity from our body by touching earthed metal objects beforehand (radiators, rails, pipes, etc.)
3: Open the case with the right tools
Using the right tools is also important. You don’t need many of them, but it’s useful to always use the indicated ones to avoid damage to the screws, however you can cause even more damage. With the help of a screwdriver – if necessary – remove the back screws in order to slide the side panels of the case (this could change depending on the type of chassis). It’s important to always work in a comfortable place, for example on top of a big table, and with sufficient lighting.
4: Disconnect all the power cables
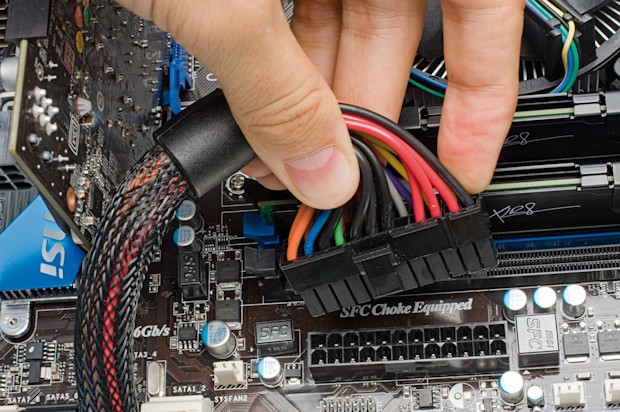
Locate the main ATX cable on the motherboard, which can have 20 or 20+4 pins and allow the separation of these four additional wires. The reason for this is because some older motherboards didn’t use them. Release it by pressing the side tab.
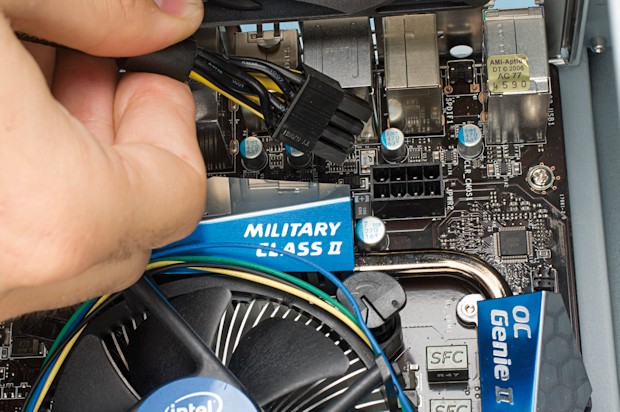
Then, do the same with the secondary cable which delivers 12 additional volts. This cable usually has eight (4+4) wires, but a lot of times you only need four depending on the type of motherboard.
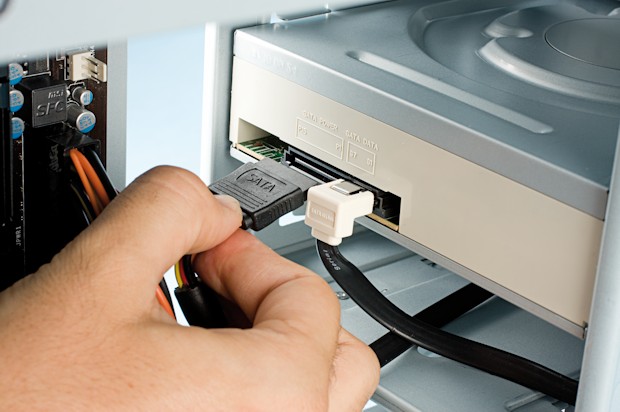
Do the same with the ends of the power cables of the hard drives and optical drives. Keep in mind that every device of this sort must have a power cord and a data cable connected.
Lastly, mid and high range graphics cards require that more power also have their own power cord. If this is your case, find it and unplug it from your card.

5: See if the power supply turns on
If you are willing to run some basic tests to see if the problem is really your power supply, keep reading. If not, maybe because you’re sure that the supply is damaged or because the current prices of these types of products are very cheap and you prefer to replace it, skip to the next step.
With the computer unplugged – I insist again – and the help of an unfolded clip, make a bridge on the power supply’s ATX cable between the green pin and any black pin (the easiest one is the adjacent one because of its proximity). If the supply works and has residual current, the fan will spin for a few seconds. If not, you can always connect it to the electricity grid – at your own risk – and check if the same thing happens (the fan will remain on). Never touch the clip’s pins with your bare hands – instead use a clamp or pliers-, although the safest thing to do would be to make the bridge first and then turn on and off from a power strip. If nothing happens, the power supply is surely damaged.
Another option is, if you have a multi-meter, is to check, with the supply plugged into power and the green-black connectors short-circuited, that the voltages are correct. However, this requires some previous knowledge and is an onerous task and is not without its risk if you aren’t an advanced user. Remember, at the slightest problem (noise, spark, burnt smell…), turn off the supply.
Even so, these tests can’t assure us that the power supply is working correctly. You have to keep in mind that it is without power when all the cables are disconnected and for this reason you wont be able to truly check if the output voltage regulation is correct.
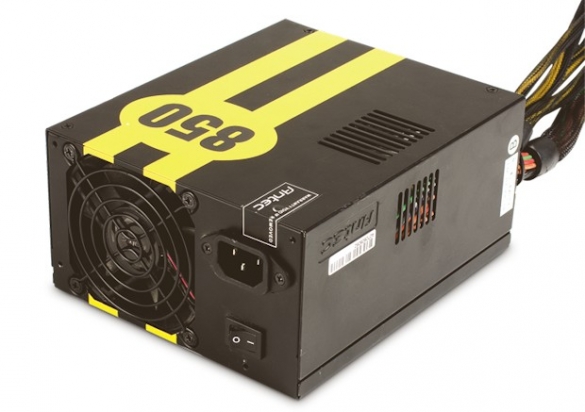
6: Choose and buy a new supply
If the power supply doesn’t turn on or you have decided to replace it, it’s time to choose a new one. Fixing the old one is not a cheap option, so it’s not worth it unless you have time and are knowledgeable in electronics. When choosing, you can always opt for one with the same power as the last one. However, if you prefer – it’s better to have more than you need for future expansions since if you don’t, the hardware won’t function properly-, you can opt for one that supports more power.
To calculate the minimum power you need, you can use the online calculator eXtreme Power Supply Calcultor Lite. You input all of your components and it will give you the minimum amount of power your new power supply must have.
7: Remove the supply and install the new one
As a general rule, all power supplies are attached to the motherboard via four back screws. Unscrew them and the old supply should come out without any problems.
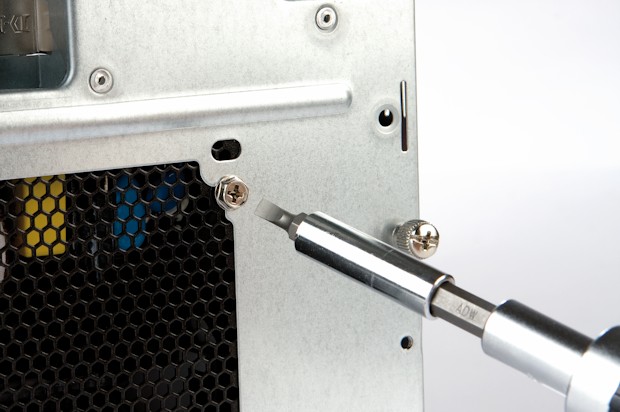
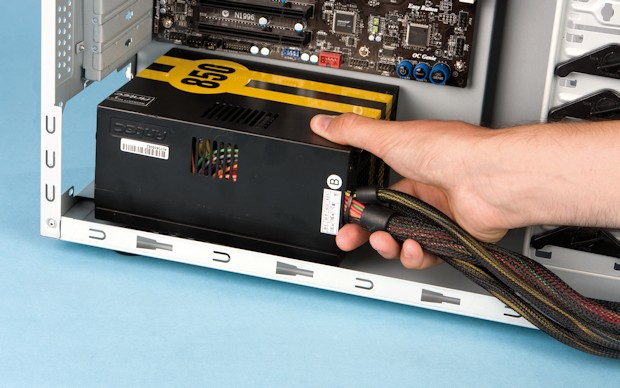
Now take the new one and place it inside the case. The position of the supply is unique and fits in perfectly where you removed the old one. Once it is in place, screw it firmly but without forcing it.
8: Connect and arrange the internal cables
Now it’s time to undo everything and plug all the cables back in. It’s important to know that you should never force or modify the components and or the internal cables of your computer. If some component has a dent or something similar and it doesn’t seem to fit, don’t panic, you’re doing something wrong. All of the different terminals’ connections are unique and everything must fit snugly without the need of force.
First locate the strip of cables coming out of the new supply and separate the ones that correspond to the motherboard and the ones that affect the rest of the components. Take the main ATX cable (remember, the 20 or 24 pin one) and insert it in the only position it fits, until it’s blocked by the retaining tab. Then do the same with the cable that supplies 12 additional volts (4 or 8 pin).
Now connect the ends of the MOLES or SATA cables to each of the hard drives and optical drives. Finally, take the PCI Express 6 pin cable(s) of the power supply and connect it to your graphics card.
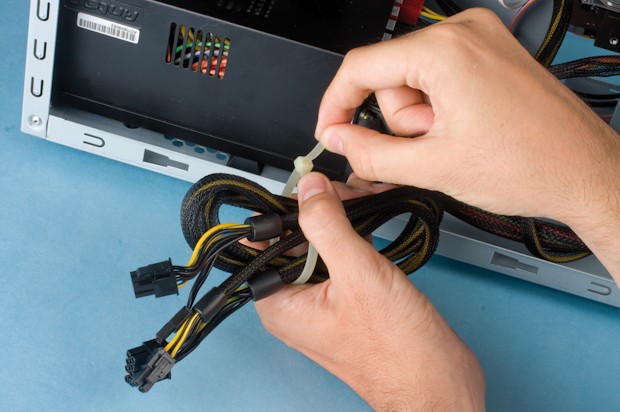
Now all you need to do is organize all of the wiring to facilitate cleaning the computer and, specially, so that the air flow of the case is optimal. You can use flanges, plasticized wiring or even some adhesives. You may have to remove some component for best results. For example, you can pass the power cord of the motherboard through the hole left by the graphics card or take advantage of the space left behind the back cover to better organize the cables.
Close both covers, screw them in, connect all the back cables and check to see if the computer works. If everything went correctly, it should turn on without any problems. You now know how to replace your computer’s power supply.
Read More:
Best PC Power Supply
Best Graphics Card: Advice and tips for buying
Best Gaming Monitor
Best Gaming Laptop