To capture images of the best possible quality, we need the best possible gear. Every part of the photographer’s equipment must be as good as possible, while still staying within the budget. The monitor, hence, is also one of the devices that we should examine very carefully before making our purchase decision.
In a computer that will be used to edit pictures, we should look for the best processor available within our budget. We must also allow for enough RAM overflow and all necessary kinds of ports. The monitor needs to also be of the highest possible quality and as large as possible without being too bulky.
Having the best camera won’t be very useful if the monitor you are using to see and edit the image is of poor quality and barely displays any pixels. The monitor is equally as important as the optical camera. I always say that it’s better to spend less on a camera while investing more on the best lens and monitor while staying in the budget.
But, how will we, digital image nerds, find a suitable monitor? The below guide will help you do the same.
Best Monitor for Photo Editing Comparison:
A good monitor will let us see colors as they are and when we print the pictures. We would get the expected results as long as we’ve calibrated and activated color management feature. First, I’ll list some monitors that are great for Photo Editing:
A good monitor will let you see colors as they are and when we print the pictures, they will be similar to what we saw on the monitor. We would get the expected results as long as we’ve calibrated and activated the color management feature. Before seeing the main features that we should look for before purchasing the monitor. Let us pay attention to the list of suitable monitors.
[table “10” not found /]Main features to look for:
Budget constraints – Size and quality
The size of your monitor can be broken down into two separate components. First, there is the screen size that is measured diagonally across the monitor. Next, there is the screen ratio, which is represented by the length of the monitor’s width divided by its height. It is essential to carefully consider your screen size since bigger doesn’t always mean better. Think about your workspace and see what optimal screen size would look like for your desk.
Having a smaller (not too small) monitor with high reliability is preferable to have a bigger monitor that might have display issues with color distortions each time you move your head.
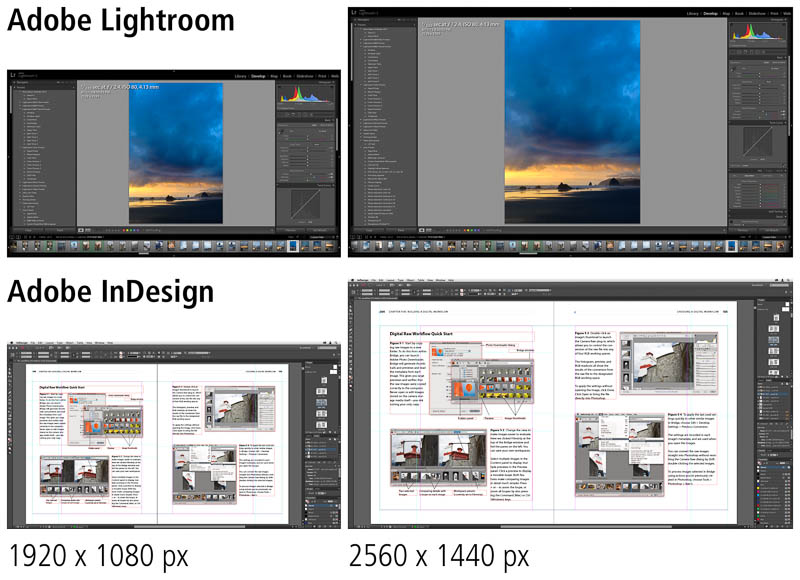
A secondary display unit might be worth considering regardless of what primary LCD you have. The user can zoom in while using the majority of the Adobe Lightroom tools on a 24-inch screen while using another monitor to see a full-screen version of the same image while it is still being edited. I would recommend not to go for screen size smaller than 23 inches since there is not enough space to see image details. That should factor into your decision as to what size screen you want for yourself.
My advice: Unless you have two monitors, I highly recommend getting a screen with a size between 27”-32”. Larger screen size will make image editing easy. Hence, I recommend passing on any monitor that has a screen size smaller than 23 inches.
Recently, there has been a demand for screens with a width to height ratio of 16:9. This ratio is used extensively in standard HD televisions. While it is terrific for watching films in high resolution, this might not be useful to photographers. From my experience, screens with a 16:10 ratio are better because their image width to height ratio is similar to most cameras. Because of this, more screen space becomes available for you. This compatible image ratio becomes helpful when you have to edit your beautiful images.

What Type of Monitor Should You Get?
There are many different screen options out there for us: LCD, LED, TN, IPS, and many other available choices. So many options can quickly become overwhelming. Which option will suit your personal needs best? Let’s start with screen type.
Concerning pricing, the cheapest monitors come with twisted nematic (TN) displays. While these monitors have the fastest response time, they don’t have excellent color reproduction, they have narrow viewing angles (limited to 160°), and they have poor black levels. Because of these limitations, these monitors are ideal only for gaming and basic word processing. Hence, if you’re looking to purchase a new monitor for serious photographic work, I would not recommend getting a TN monitor.
A serious photographer should purchase an IPS screen or better. IPS screens used to be the most expensive monitors on the market in the past. However, the prices have considerably dropped in the last few years. Even if you are taking photographs only for your personal needs and need to edit them regularly, you should highly consider an IPS screen. It has a slower response time though. However, quick response time is not crucial for photo editing. The IPS screen allows for much deeper blacks, better color renderings, balanced and improved contrasts, and viewing angles of almost 180°.
VA – (Vertical Alignment) monitors are LCDs with vertical alignment and represent the middle between TN and IPS. VA monitors allow for better viewing angles and color renderings when compared with TN monitors. However, the response time is slower. This could result in very high contrast value, which may prove to be a disadvantage.
Bit depth
When examining any screens, you should consider what bit depth you want. IPS screens are mostly either 6 or 8 bits. As more bits the screen has, the more expensive it becomes. So, what’s the difference between the two bit depths? The number of bits indicates the quality of images, which is especially important for printed images. If you want large high quality images, I would recommend purchasing an 8-bit screen or even a 10-bit screen.
Most monitors take 8 bits of data for each RGB (red, green, blue) channel from your graphics card. Some displays are being advertised as having 10 bits per channel (BPC). These displays are marketed to creative professionals. However, it is essential to learn how you can truly make use of a 10 bit enabled screen. To make full use of 10 bit color display, your operating system, display connection, graphics drivers, and display, etc. must all support 10 BPC color. If even one of these does not support 10 BPC, you won’t see 10 BPC colors. If you are serious about using 10 BPC colors, you would need a Windows PC with a 10 BPC graphics card that is either connected to a Dual-Link Digital Visual Interface (DVI) or Display Port connector to a 10 BPC monitor.
Be careful not to confuse the number of bits per channel of the monitor with the number of bits per channel for image files or a 64 bit processor. These measurements aren’t related to each other.
Resolution: Is 4K the New Standard?
When it comes to displays, higher resolution has many benefits.
People think of resolution as merely the height and width of the monitor in pixels or the number of pixels in each dimension. A display with a larger pixel dimension within the same amount of pixels per inch permits you to fit more controls on the screen at once. This enables you to see images and texts larger and more vividly.
If you always scroll and zoom because the workspace on your monitor is overcrowded with the number of tool panels and other windows in your software, you need to migrate to a higher resolution monitor.
The resolution could also mean how details of the image are shown on the screen, namely, the pixels indicated in pixels per inch (PPI). The range of most desktop and laptop displays range from 90-120 pixels per inch (PPI). People believe that pixels can only be 72 PPI, but, we now have higher PPI.
New displays that use HiDPI resolution attain image which is much closer in looks to that of the prints you take out. The prints are generally between 150 and 300 PPI. You can find HiDPI displays in various sizes for tablets, laptops, and smartphones. However, it is not easy to find them in desktop sized displays because they are not common. The popular 4k monitors are the HiDPI monitors used in desktops. 4K displays bring the screen experience close to print by displaying images that are very sharp with more detailed graphics as compared to traditional displays. By increasing the pixels to add details, you can achieve an image with more details through editing.
However, 4K technology is new. Not all available computer programs are ready for it at this time. So, a 4K display may genuinely be beneficial for these programs. Some operating systems (eg. Windows 10, Mac OS) try to smoothen any mistakes that crop up because the program is not compatible with the display, but it may not be universal.
We can now say that the advantages of using a 4k monitor depend on the applications you use. If you make use of windows applications with 4k displays and optimize them properly (e.g., Photoshop), you won’t have to worry much.
You may want to buy a new monitor without 4k display, but 4k display may become the new standard soon.
How Your Monitor Colors Work: Standard Gamut or Wide Gamut?
To understand more about how monitor color works, you need first to understand what video bit depth is. Color depth, referred to as bit depth, is either some bits used to point out a single pixel in a bit-mapped image or the number of bits used for each color’s elements within a single pixel.
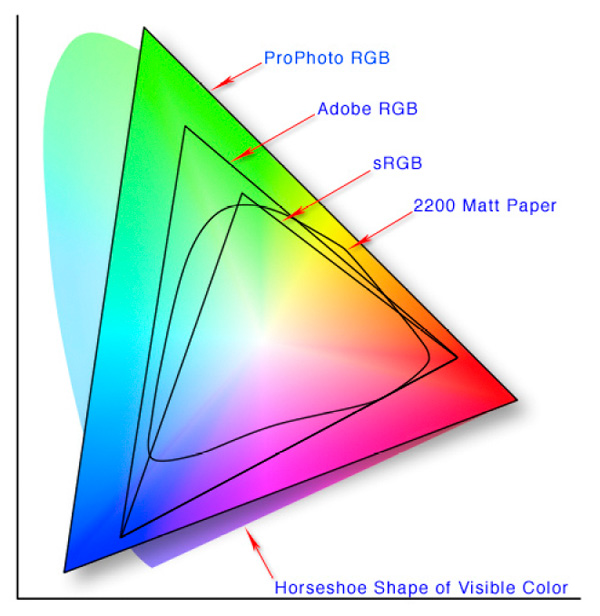
The bit depth is connected into the display color gamut, and this is the range of colors it can duplicate. Most displays can reproduce a gamut found in your sRGB (red, green, blue), which is a standard RGB space created by Microsoft and Hewlett Packard in 1998. Some displays offer a wide gamut that can duplicate as large as the Adobe RGB gamut. Usually, this gamut only benefits those people who perform color-critical work that is often reproduced on CMYK presses or fine-art printers, requiring a much larger color gamut.
Wide Gamut Displays: Are They Worth The Price?
These wide gamut displays are excellent when used for specific purpose along with programs that support them. For general use, you are wasting your money and may not be too thrilled with what you may actually end up with. Browsers and photos placed on the internet are displayed as sRGB. Unfortunately, when sRGB output is shown on these wider gamut monitors, the colors can get completely distorted. They can appear washed out or overly saturated because the colors often shift.
These wide gamut displays are excellent when used for specific purposes if they have programs that support the purpose. For normal use, you are wasting your money and may not like what you get. Browsers and photos placed on the internet are displayed as sRGB. Unfortunately, when sRGB output is shown on these wider gamut monitors, the colors can get completely distorted. They can appear washed out or overly saturated because the colors often shift.
To solve this, the wide gamut monitors support separate profiles for different purposes. Those professionals who need these wide displays have to switch from one profile to another to focus between tasks. In some cases, a color manager operating system is installed to switch between the different profiles.
When Wide Gamut Displays Are Worth It:
If the main job you will be doing is to distribute contents to websites or use online printers that only accept sRGB jpgs, Wide Gamut Displays may not be worth the extra money you spend on it. Hence, if the display is used for web designing or viewing HD videos, it would be wiser not to waste money by picking up a good sRGB monitor.
If you deal with fine-art printing that demands high-quality output and need to process a wide gamut format like Adobe 1998 or ProPhoto RGB, then you should go for it. If you have a high-end, professional inkjet printer, then it’s worth expanding your gamut.
Other applications such as photo editing, large extensive graphic designing, and other art forms that need a much larger array of colors will benefit from a wide gamut monitor/display. However, do not believe that a monitor with a wide range of color gamut is always a better printer. That may not always be the case.
Brightness: the Brighter the Better?
Maximum brightness has been heavily promoted, but does it indeed improve things? For starters, increased brightness is ideal for televisions and projectors. However, for photography and design, maximum brightness isn’t essential. Typically, for print projects, paper can’t match the range of luminance levels between 90 and 140 cd/m2, on the lower end of many displays’ ranges for brightness. Because the monitor becomes too bright to show the black correctly, the increased brightness isn’t even that useful for overcoming reflections that appear on a glossy display. For many creative projects, increasing brightness does not have a positive impact. (If glare is an issue, controlling the lighting in your workspace might be a better option than adjusting the brightness of your monitor).
Attention:
1, Many times, the brightness of monitors in shops is set to max to make the screen look brighter to attract clients.
2, Keeping the brightness too high for too long causes eye strain and tiredness.
Glossy or Matte?
Which one is better? Glossy appearances favor vibrant and contrasting colors, which are suitable for computers primarily used for entertainment purposes. Unfortunately, with photographic work, glossy screens introduce a number of disadvantages.

Where possible, I recommend that you buy a matte screen. Although shiny, glossy screens may look extremely attractive and beautiful at first glance, the reflections that are caused by them will lead you to have second thoughts.
Viewing angle:
The viewing angle is a fundamental parameter when deciding on a monitor. It defines the angle between the viewing line and the perpendicularity of the screen. Beyond the recommended viewing angle, the brightness and the chromaticity start to alter. The higher the viewing angle, the better the control on the whole image will be.
To evaluate if a monitor is suitable for photo editing and to see the monitor’s effective viewing angle, you should first load an image in full-screen mode. Next, enlarge the image to 100% and finally, rotate the monitor up to 180°. If the image remains unchanged in brightness and contrast, the monitor can be considered suitable for photo editing.
High contrast ratio.
A display’s contrast ratio is the ratio of its brightest white’s luminance to that of the darkest black the system is capable of producing. Higher contrast ratios show more tonal gradations. This is helpful for photo editing. An 800:1 ratio should be the baseline for image editing purposes, but other monitors offer higher contrast ratios. When you consider display manufacturer specifications, check if the contrast ratio is static or dynamic. Static should be preferred over dynamic.
Finally, the quality of a screen’s display depends on the age of your graphics card. If your graphics card is too old, that may cause you to blame the screen you are testing. The older graphics card may not be able to produce the quality you want for your images.
Calibrating the Monitor is important!
Once you’ve brought your monitor home, it is critical to calibrate it. Calibration is an absolute must if you are serious about image editing. If you don’t want to spend money on a hardware calibrator, make sure to use a calibration software at least. Although software calibrators aren’t as accurate as hardware calibrators, they will still make a considerable difference. Many monitors with price tags of at least $800 will have the Color Profile app preinstalled. This app does an excellent job of improving the quality of your screen. If your monitor does not come with a calibration tool, consider getting the Datacolor Spyder5 PRO or the X-Rite ColorMunki Display. You should try to calibrate your monitor at least once every month to make sure the images show as per your requirement.
Forget VGA cable!
Should you use a VGA Cable to connect your monitor to the CPU? This is an important question for professional photo editors. Many people are still using VGA cables that come with the monitor. A VGA is an analog cable that does not give all the information your monitor needs for a great picture. Most of today’s monitors have a DVI connection along with HDMI and Display Ports, which are significantly advanced than a VGA cable. When purchasing a monitor, make sure at least one of these cables is provided. Try to avoid a VGA cable.
If your graphics card is too old, buy a new one!
As we discussed before, the quality of a screen’s display depends on the age of your graphics card. If your graphics card is too old, you should consider replacing it with a new updated graphics card as soon as possible.
Our recommendation of Best Monitor for Photo Editing:
Best monitor for photo editing above 1000$:
My recommendation: EIZO ColorEdge CG277
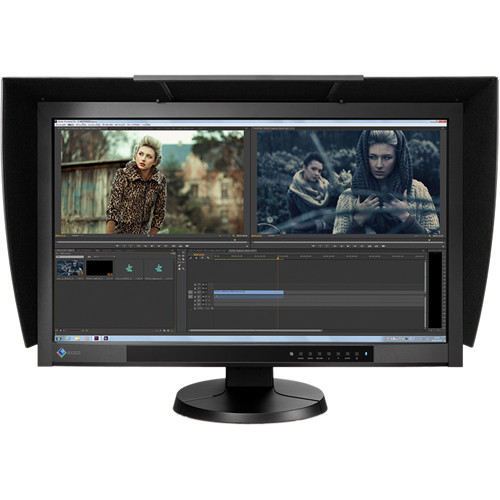
The EIZO ColorEdge CG277 monitor is designed with digital photography professionals in mind. Suitable for photo editing, video editing, prepress, and post-production, it is the premier model in EIZO’s range. The CG277 is a 27 inch monitor, with 2560×1440 pixel resolution and has an IPS panel with a wide color gamut. This is capable of reproducing 99% of the Adobe RGB color gamut, which means that any images shot in RAW can be converted to Adobe RGB. Further, all images that are shot in Adobe RGB would be correctly displayed.
Other features of the ColorEdge CG277 monitor include HDMI and DVI-D inputs, DisplayPort, LED backlighting, and a 10-bit display with 16-bit look-up table. Once the monitor is switched on, it takes just 7 minutes to achieve stable brightness, chromaticity, and tone. The monitor comes with a shading hood that is designed to work in both portrait and landscape modes while it sits on top of an ergonomically designed stand.
As this is EIZO’s flagship monitor, the display comes complete with a calibration sensor. Calibration can be automated with the built-in SelfCalibration sensor and EIZO’s Color Navigator 6 software. This comes built in to the bottom bezel of the monitor and can be used even in portrait mode. The sensor can either be used independently or correlated to an external colorimeter, such as the ColorMunki or X-Rite i1. This means that the professionals using multiple screens can be guaranteed of the same color. So, whether used individually or within a company, which requires that the same sensor be used for all displays, the option is there for you.
The various inputs are all well thought out. With DisplayPort, DVI-D, and HDMI inputs, it is possible to connect most types of graphics adapters. Digital cameras can also be connected via the HDMI input. The two USB upstream ports are included, so that two computers can be connected at the same time when using the ColorNavigator software.
When the DisplayPort connection is used, simultaneous 10-bit color display via a 16-bit look-up table is possible. This effectively allows the monitor to display over a billion colors at once. This is significantly more than that achieved when using an 8-bit display (64 times in fact), resulting in far smoother color gradations.
The ColorEdge CG277 monitor is superb at delivering impeccable color accuracy. This makes it highly desirable for imaging professionals who work in stills and videos. The appeal of the monitor is, perhaps, limited to some degree by the absence of 4K resolution. The result, though, is that the price of this display is falling, making it a great time to buy.
My advice:
Although the CG277 does not have 4K resolution, it has incredible color accuracy. If 4K resolution is not important, it makes an ideal monitor for imaging professionals. With prices dropping, now might be the right time to invest in one.
Read More information and User Reviews on Amazon | B&H Photo
Best monitor for photo editing under 1000$
My recommendation: BenQ BL2711U
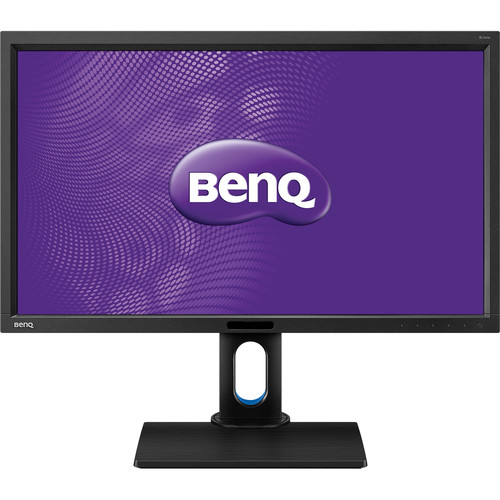
The BenQ BL2711U is a feature rich, 27-inch, UHD IPS LED monitor that is suitable for users who require CAD-oriented panel with the greatest graphic quality available. The ultra high definition (UHD) capability translates into resolution settings up to 3840 x 2160. Because of the AHVA panel, 100% sRGB, and UltraVivid technologies, this monitor provides amazing clarity and color in a full range of viewing angles of up to 178 degrees. The BenQ offers a 1000:1 native contrast and up to a 20,000,000:1 dynamic contrast. Like popular top-end gaming monitors, this one offers Low Blue Light modes and Flicker-Free Technology.
User will appreciate the adjustable 10 levels of brightness. As a gaming monitor, it can show more details in darker areas. The monitor panel also features an ambient light sensor. Aligned in the bottom center of the screen, it automatically adjusts the backlighting to suit the amount of light in the room and around you. An additional Eco-sensor minimizes brightness when the user approaches the screen as well.
Numerous presets offer screen customization for use with CAD/CAM, video or photo editing work, animation, and more. Picture in picture (PiP) and picture by picture (PbP) modes are also supported. Both 1.4 and 2.0 HDMI ports, a DisplayPort, and a DVI-D are included for convenience and flexibility.
The BenQ BL2711U offers more than better dynamic ergonomics than the average gaming monitors and desktops. Besides, the BenQ BL2711U is geared towards the professional users who require even more options. These include height adjustability to 140mm, a 90° pivot, -5° to +20° tilt, and a 45° swivel. The monitor can be set up to 150 mm above the work surface. Display Pilot technology will automatically pivot the display when the computer user shifts the physical monitor. This allows for the best continual views, regardless to whether you use portrait or landscape layouts.
Display color, sharpness, and clarity are stunning for BenQ BL2711U. The overall quality of this display puts the monitor up near at the top of the list among all the monitors that we have reviewed so far. The 2K4K resolutions obviously improve display quality, but this UHD monitor offers a more intense color range than other models. Whether you want a powerful panel for CAD work, digital or graphic art, video editing, or even gaming at top resolutions, this BenQ monitor will exceed beyond all of your existing expectations. Because this is a professional level monitor, how it is priced varies considerably based on consumer-level options.
Read More information and User Reviews on Amazon | B&H Photo
Best monitor for photo editing under 500$
My recommendation: Dell Ultra HD 4K Monitor P2715Q
Dell P (Professional) Series monitors used to be considered worse than the U (UltraSharp) models because it offered less features and capabilities to users who needed a more powerful panel. Lately, Dell is upping its game with recent inclusions to the line like the P2414H with its IPS panels instead of the TN varieties used in earlier versions. Now Dell is exploring the higher resolutions found in the “4K” UHD technologies. The P2415Q and P2715Q are examples of the higher level of resolution and capabilities that they offer to users with more exacting requirements.
Not much has changed about the appearance or structure from the older P series models to these newer offerings. The bezels maintain a similar size and thickness. They are constructed of black plastic in a matte finish and feature the same corner contouring. The base allows for a full range of adjustment with height, tilt, pivot and swivel dynamic options. Users who prefer tactile buttons over touch-sensitive types will appreciate the menu and adjustment buttons down the right hand side of the monitor frame.
The Dell P2415Q and P2715Q monitors both offer “4K” UHD resolutions up to 3840 x 2160 but are sized differently and thus the pixel displays vary in density. Advanced High-Performance In-Plane Switching (AH-IPS) 60Hz LG panels are utilized to give consistent and accurate color and clarity when viewed at a considerable side angle. The static contrast remains at 1000:1. The screen surface is considered light matte or semi-glossy on all the high resolution and WQHD panels they offer.
WLED backlights are included in both aforementioned monitor models. They offer the standard variation of 99% sRGB coverage. The smaller 23.8″ monitor offers a maximum luminance of 300 cd/m2 while the larger 27″ monitor bumps that up to 350 cd/m2 typical maximum luminance. Dell states that each model supports up to 1.07 billion colors for 10-bit or 8-bit with FRC dithering and a deltaE less than 3 with factory settings.
The different models of Dell monitor now offer adjustable overdrive settings. The P24 “Normal” setting sits at 8ms for grey to grey and the P27 at normal offers 8.6ms. The “Fast” setting bumps speeds down to 6ms for typical grey to grey. While these numbers may appear to be surprising high compared to other models on the market today, Dell has long been known for exacting and realistic accuracy in its specifications that may be lacking from other manufacturers. These speeds provide optimal function and display at 60Hz performance. With the Dell monitors, the numbers are consistent and do not lead to pixel overdrive problems.
The monitor stands are affixed using standard 100x100mm flat panel or VESA connection. They can easily be switched out for other options if the user desires.
Dell’s P2715Q differs from other 4K monitors we’ve seen in the past. While many of the others provides the same great image quality, their prices were well out of reach of most consumers. This one is different in that regard. Without sacrificing the Ultra HD quality or doing away with the ergonomic stand, it offers a very budget-friendly price.
Read More information and User Reviews on Amazon | B&H Photo
Best budget monitor for photo editing under 300$
My recommendation: ASUS PA248Q
Professional designers and others who work with color-sensitive projects will appreciate the Asus PA series monitors. They combine high performance with a reasonable retail price that is accessible to most members of the targeted consumer base. The PA 248Q, which is a great option instead of HP’s ZR2440w or Dell’s U2412M monitors, gives you 24 inches of standard screen space. Wide gamut options are also offered for sale, such as the PA249Q, but every day users who do not need the extra dimensions for video or graphic work can still get clarity and accurate color with the PA248Q model. This gives a quality screen with no wide gamut complications. Maximum resolution is 1920 x 1200 with a 16:10 aspect ratio. This comes from IPS panel, so overall performance is quite high. Factory calibration ensures that all colors are completely accurate and clearly visible.
Although the Asus PA248Q costs much more than the Dell U2412M (Details on Amazon), it is priced lower than HP’s ZR2440w model. Whether it brings enough added value to warrant the higher price when compared with the Dell option is up to you, but it is another choice when shopping for 24 inch standard monitors. The 16:10 aspect ratio monitor with IPS panel is not excessively represented on the market today, so the Asus, HP and Dell remain your best choices.
Read More information and User Reviews on B&H Photo | Amazon
Acer G257HU
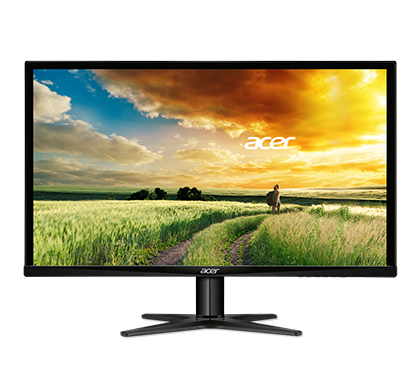
If you need an economical WQHD monitor, you might consider checking out the Acer G257HU model. The piece of hardware itself is sleek and stylish and it offers accurate color and grayscale, plenty of settings for best picture and doesn’t cost as much as you might think. This monitor does lack an adjustable stand, so you are not able to be pivot, swivel, raise or lower the monitor. It also does not include a USB port. Despite these negative aspects, the G257HU was chosen for our Editor’s Choice award for mainstream monitors in the middle of size range. The Dell Ultrasharp UZ2315H (Details on Amazon) may be a better option if you need I/O connectivity, a USB hub, MHL ports, microphone and WebCam. Its color accuracy is comparable to the G257HU , but clarity suffers some in gray scale. It is also smaller at only 23 inches and has a 1920 x 1080 screen resolution.
Read More information and User Reviews on Amazon
Best budget monitor for photo editing under 200$:
My recommendation: Asus MX239H
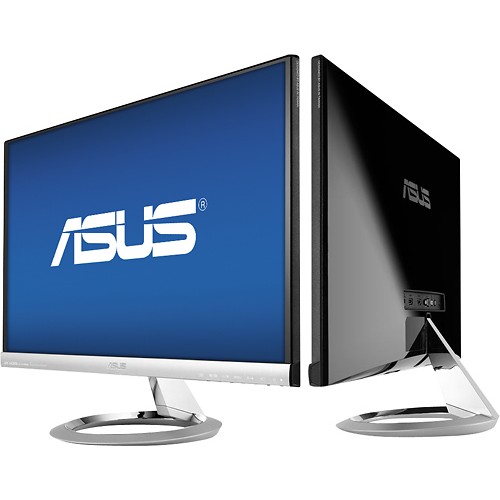
Many consumers preferred the modern look of sleek, bezel-free monitors because they fit better on smaller desks and generally look better than clunkier older models. If you want monitor with a floating screen style, the Asus MX239H may be a perfect choice. You get a high level of clarity, accurate color display and extra wide view with its AH-IPS (advanced high-performance in-plane switching) panel. Grayscale is not as clear as we would like and some of the controls for different functions do not operate as predictably as they should.
If you are in the market for a 23 inch IPS monitor, the Asus MX239H is a good choice. Although the function controls can aggravate, and it lacks proper ergonomic stand options, its high performance color display and wide-angle view are definite positives. It also includes two HDMI ports, which make this monitor exceptional for use with a Blu-ray player or videogame console.
That’s amazing!
I personally use Dell P2417H at my home. The best thing which I love about my monitor is that I can easily adjust the height and rotate the screen in multiple angels. P2417H is somewhat similar to P2415Q (mentioned on your list) but mine is not a 4K display. Thanks for sharing this amazing list, it definitely deserves a share from my side 🙂
Thank you so much dear! kisses
Any opinions on some of Samsungs monitors that are in the 32-34″ range? Samsung is claiming 125% sRGB color gamut on some of them.
What’s your bunget? You can look at these two monitor: Samsung C32H711 (https://www.amazon.com/dp/B06XT67BR7/tag=tabletpcnow-20) and Samsung CF791 (https://www.amazon.com/dp/B01M1D7JVO/tag=tabletpcnow-20)
I’ve seen those two. Just would like to know if those products would be ones that would be considered as good for photo/video editing. Not sure I understand how they can claim sRGB color gamut over 100%.
Thanks
Bit of confusion on the Dell UP3216Q. It’s listed as a 34″, but its really a 32″. Is the model# or size wrong?
Sorry, it’s my mistake, it’s a 31.5 inch monitor.
Thanks for clarifying.
I’d love to see a video card review from you (aimed toward photoediting & CAD).
Thank you!
This is an excellent, well written article that is very timely.
I hate the 16:9 ratio and lament the passing of the 4:3 ratio. I was told that the 4:3 ratio and 16:10 ratio monitors are more expensive to make and that is why you can’t find them new anymore (at least the 4:3 ratio, I know you can still find 16:10).
Thank you for this great review!
Hi, I’m a beginner to this hobby and recently thought about upgrading my monitor. I came across ViewSonic’s VP2468, has anyone had the chance to use this monitor? Apparently the price is reasonable, claims to have 100% sRGB with a Delta E less than 2. Also factory calibrated. If you have any knowledge to this product please share with me.
I’m a photographer who is in the middle of building my first DIY PC. I have been an iMac person for over a decade, so it’s very stressful. I had all the components picked out after a few weeks research, except for the display. Talk about stressful. Like most people I want the best monitor I can get but am really taxed financially after the PC cost. More than the price, my biggest issue has been swimming through the myriad options, specs, brands, sizes, and on and on and on it goes. It’s maddening to be completely honest. I have read so much crap online up to this point that I honestly think I might be just slightly worse off than when I started. All of this long-winded intro was just to say that I really, really appreciate this article… it’s been the most helpful, informative and clear piece I have read to date – with regard to a “photographer” vis-a-vis displays, and not necessarily a “gamer” buying one. Heck, I’d almost pay money for an article about GPU’s that was as on-point. Thanks very much for your time and trouble in publishing this information.
Thomas, may I ask what you ended up purchasing? I am in the same boat: first foray out of the iMac world, building our own computer and stressing over the perfect display. I’ve nearly purchased about 3, but keep chickening out. I think I’ve narrowed it down to a BenQ or Asus but I”m still waffling. Curious what you settled on after all your research.
i understand your angst buddy.. from now ow, whoever is in the same boat… i will classify them as being in “Logans Run”.
but seriously. i was in a Datacolor spyder , etc., workshop just a couple of days ago. The head of sales and marketing said that if i have the spyder studio kit i should go with the BenQ adobe RGB monitor. But reading all the things, i think it is overkill. I dont thing with my amateur printers (that actually put out Lab quality images sometimes… hit and miss).. I wonder if sRGB is the common sense answer.
Its like getting a Ferrari,, and then you are forced to stick to under 65mph… but 2% of the time you will utilize the full potential.
That i can sublet/ rent./ will not miss.
Even the best archival printers.. that i will never have access to.. will not benifit from an Adobe RGB monitor in my humble opinion.
Nuff said.. i am in the same boat… lets do the Logan’s Run.. and lets get some help from the right kind of people… THanks for reading.
Hey. What is your recommendation for a wide gamut monitor for photo editing. Any product in particular that you recommend? And why?